How to Charge an RV Battery With a Battery Charger
Charging an RV battery with a battery charger is a simple way to restore power when your battery runs low. However, using the wrong charger or settings can damage the battery and shorten its lifespan. The correct process depends on your battery type, voltage, and charger specifications.
This guide explains how to charge an RV battery safely, choose the right charger, estimate charging time, and solve common problems.
Can You Charge an RV Battery With a Regular Battery Charger?
Yes, you can charge many RV batteries with a regular battery charger. However, the charger must match the battery’s voltage, chemistry, and charging requirements.
For example, a 12-volt RV battery needs a compatible 12-volt charger. A charger designed only for lead-acid batteries may not work properly with a lithium battery.
A smart battery charger is usually a better choice. It controls the charging process and can reduce the risk of overcharging when used correctly. Before connecting anything, check the battery label and both manufacturers’ instructions.
Choose the Right Charger for Your RV Battery
Your RV battery type determines which charger you should use. Common options include flooded lead-acid, AGM, gel, and lithium batteries.
| Battery Type | Recommended Charger |
|---|---|
| Flooded lead-acid | Compatible lead-acid smart charger |
| AGM | AGM-compatible charger |
| Gel | Gel-compatible charger |
| LiFePO4 lithium | Lithium-compatible charger |
Do not assume that every charger supports all four types. Some chargers have separate battery modes, while others support only certain chemistries.
A lithium battery generally needs a charger with an approved lithium charging profile. Avoid lead-acid equalization modes unless the battery manufacturer specifically permits them.
How to Charge an RV Battery With a Battery Charger
Follow these steps before and during charging. Your specific charger and RV manuals should always take priority.
Park the RV and Turn Off Electrical Loads
Park your RV on a stable surface and turn off unnecessary electrical equipment. Switch off lights, fans, appliances, and other devices that use battery power.
Make sure the charging area has good ventilation. Keep cigarettes, flames, and sparks away from the battery.
Identify the Battery Type and Voltage
Check the battery label or owner’s manual to identify its chemistry and voltage. Most RV house battery systems use 12 volts, but some setups use different system voltages.
Also check the battery’s amp-hour (Ah) capacity. This rating helps you understand how much energy the battery can store and how long charging may take.
If your RV has multiple batteries connected together, confirm the total bank voltage. Never connect a charger without checking the complete battery configuration.
Inspect the Battery and Terminals
Look for loose connections, corrosion, damaged cables, cracks, or swelling. Do not charge a damaged, leaking, or frozen battery.
If you have a flooded lead-acid battery, check its electrolyte level according to the manufacturer’s instructions. Add distilled water only when required. Never open a sealed AGM, gel, or lithium battery.
Connect the Charger Clips Correctly
Make sure the charger is switched off and disconnected from its power source before attaching the clips.
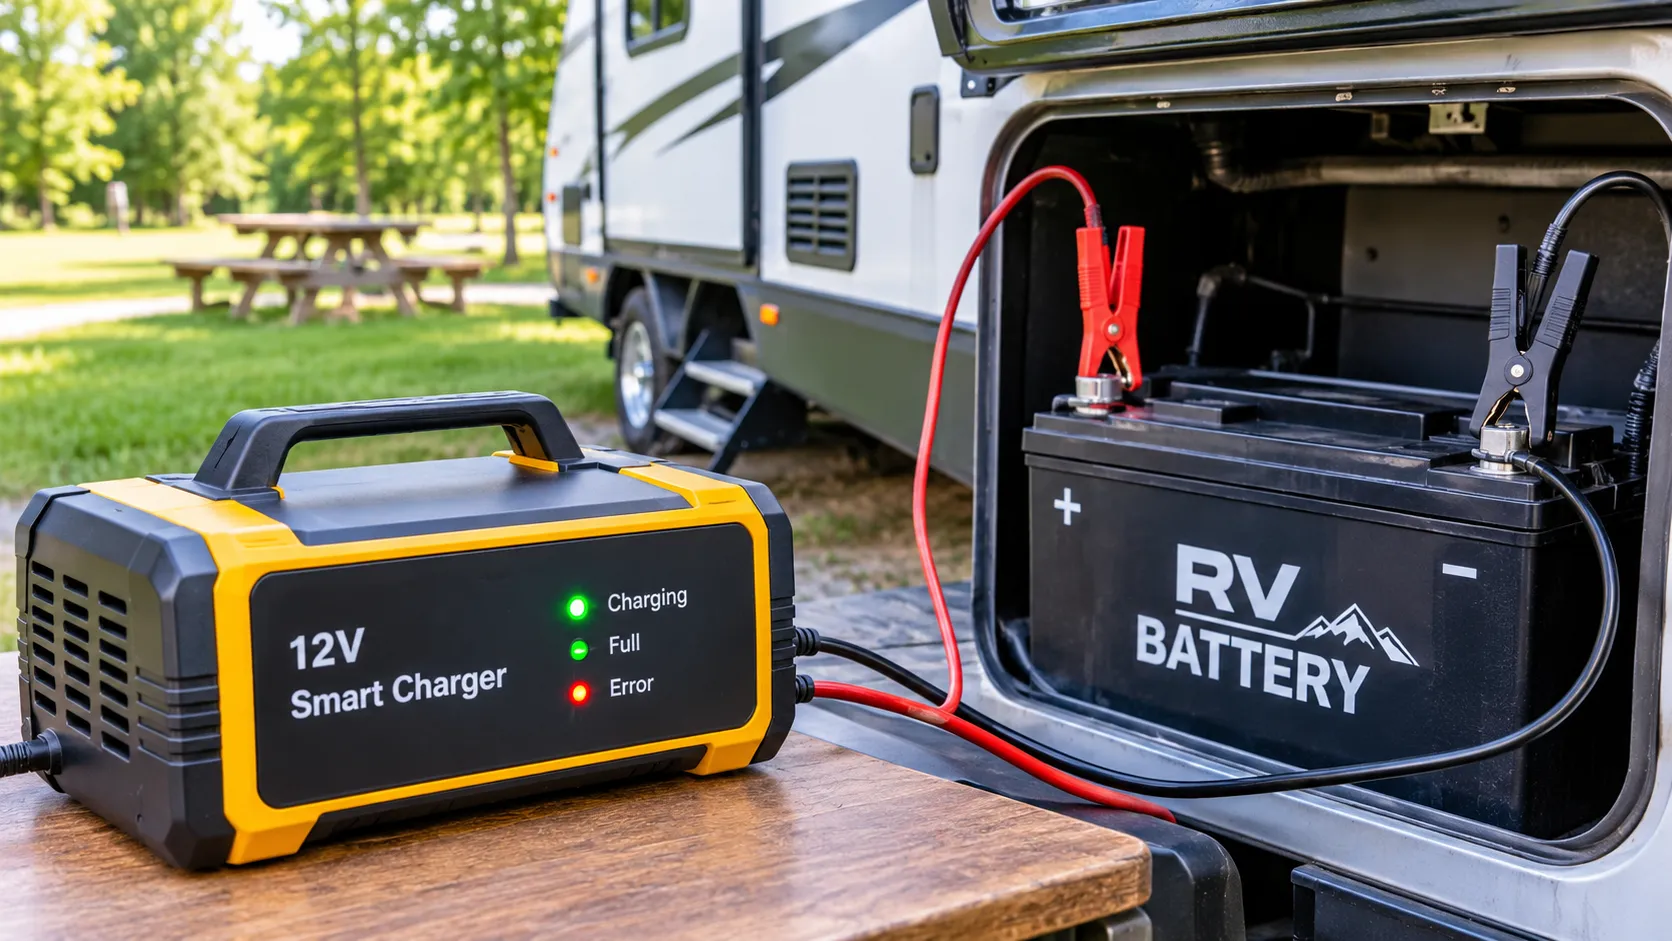
Connect the red positive clip to the battery’s positive (+) terminal. Then connect the black negative clip to the negative (-) terminal or the approved grounding point specified by the charger manufacturer.
Check both connections carefully. Reversed polarity can damage equipment and create a safety risk.
Select the Correct Charging Mode
Choose the battery type on your charger if it offers different settings. For example, select AGM for an AGM battery or lithium for a compatible LiFePO4 battery.
Check the charging current as well. It must stay within the battery manufacturer’s recommended limit. A higher amp setting does not automatically mean better charging.
Start Charging and Monitor the Battery
Once the connections and settings are correct, connect the charger to its approved power source and switch it on.
Watch the charger display or indicator lights to check the charging progress. Stop immediately if you notice unusual heat, swelling, smoke, strong odors, or other warning signs.
Do not ignore a battery that becomes unusually hot or behaves differently than normal.
Turn Off the Charger and Remove the Clips
When the charger indicates that charging is complete, switch it off and disconnect it from the AC power source.
Then remove the negative clip followed by the positive clip, unless your charger’s manual specifies another sequence. Store the cables safely and check that the battery connections are secure before using the RV.
How Long Does It Take to Charge an RV Battery?
Charging time depends on battery capacity, remaining charge, charger output, battery chemistry, temperature, and electrical loads.
You can use this basic formula to estimate the charging time:
Estimated charging time = Battery capacity (Ah) × Charge needed (%) ÷ Charger output (amps)
For example, a 100Ah battery that needs 50% of its capacity restored requires about 50Ah of charging. With a 10-amp charger, the simple estimate is five hours.
However, actual charging usually takes longer. Charging slows near full capacity, and some energy is lost during the process. Always use the charger display or an appropriate battery monitor to check charging progress.
Can You Charge an RV Battery Without Removing It?
Yes, many RV batteries can be charged while they remain installed. You may not need to remove the battery or disconnect every cable.
However, this depends on the RV’s electrical system and the charger’s instructions. Some onboard systems can remain connected during charging, while other setups may require isolation.
Before connecting an external charger, check whether the RV’s converter or inverter-charger is already charging the battery. Avoid connecting charging equipment in a way that creates conflicting charging sources.
If you are unsure about the wiring, ask a qualified RV technician to inspect the setup.
Common RV Battery Charging Problems
Charging problems can come from incorrect settings, poor connections, or a battery that has reached the end of its useful life.
The charger does not start: Check the power outlet, charger cables, battery voltage, and polarity. Some chargers cannot detect batteries with extremely low voltage.
The battery charges slowly: The charger may have a low amp rating, or the battery may be larger than expected. Electrical devices left running can also slow the charging process.
The battery will not reach full charge: Check the selected battery mode and inspect the connections. A weak or damaged battery may also fail to hold a full charge.
The charger shows an error: Read the charger’s manual to understand the warning. Do not keep restarting it without finding the cause.
If the battery repeatedly fails to charge, have the battery and charging system tested.
Safety Tips for Charging an RV Battery
Safe charging protects both your battery and your RV. Follow these basic precautions:
- Use a charger designed for your battery chemistry and voltage.
- Charge in a well-ventilated area, especially with flooded lead-acid batteries.
- Keep flames, cigarettes, and sparks away from the battery.
- Wear suitable eye protection when working around lead-acid batteries.
- Never charge a damaged, leaking, or frozen battery.
- Keep charger cables away from moving parts and hot surfaces.
- Do not exceed the battery’s recommended charging current.
- Follow the manufacturer’s temperature limits and charging instructions.
If you notice smoke, leaking, swelling, or excessive heat, stop charging and move away from the battery.
Frequently Asked Questions
Can I Use a Car Battery Charger for My RV Battery?
Yes, if the car charger supports your RV battery’s voltage, chemistry, and charging requirements. A basic lead-acid charger should not automatically be used on a lithium battery.
Should I Disconnect My RV Battery Before Charging?
Not always. Some RV batteries can be charged while connected to the electrical system. Check the RV and charger manuals before disconnecting any cables.
Is a 10-Amp Charger Enough for an RV Battery?
A 10-amp charger can charge many RV batteries, but it may take longer with a large battery bank. Check the battery’s capacity and recommended charging current before choosing a charger.
Can I Leave My RV Battery on a Charger Overnight?
You can use a compatible automatic smart charger if the manufacturer approves it for extended connection. Avoid leaving a battery on an unregulated charger because it may overcharge.
Can a Dead RV Battery Be Recharged?
Sometimes. A deeply discharged battery may recover if it is still in good condition and the charger supports its voltage. However, a damaged or severely discharged battery may need professional testing or replacement.
Conclusion
Charging an RV battery with a battery charger is straightforward when you use compatible equipment and follow the correct steps. First, identify the battery type and voltage. Then connect the charger carefully, select the right charging mode, and monitor the process.
Most importantly, follow the battery and charger manufacturer’s instructions. The correct charging setup helps protect your battery and keeps your RV’s electrical system ready for your next trip.
For more helpful guides on battery storage, solar power, and off-grid energy, visit Pure Green Life.
Disclaimer: This article provides general educational information. Battery specifications and charging requirements vary by manufacturer. Always follow your equipment manuals and consult a qualified technician when needed.